Even lean women can have a tummy bulge. Doing these yoga exercises for PCOS belly will reduce your waist size and ease PCOS symptoms!
The tummy area is probably the fat’s favorite part to accumulate in. No matter how much you try to watch your diet, your belly never seems to tuck in.
This can be frustrating for women with PCOS. It is a serious hormonal disorder that affects your adrenal gland and thyroid gland that play an essential role in your metabolism regulation.
This means that during PCOS your metabolism slows down and you burn fewer calories and store more in the form of fat in your body.
Moreover, having to deal with high stress (cortisol) levels, insulin resistance and elevated testosterone levels leads to the disposition of unwanted fat in various body parts.
One way to fuel your slow metabolism and improve hormonal glands is to practice these yoga exercises for PCOS belly.
Let’s try them out!
10 Easy yoga for PCOS belly reduction
Experts recommend two to three days a week from thirty minutes to an hour and a half each, maximum, as the ideal amount of time to spend practicing yoga.
It has been found in a study that women who did regular yoga practice for at least 3 months had a significant decrease in their testosterone levels which helped in managing insulin resistance and reducing the waist to hip ratio.
Even if you only spend one hour a week, total, on yoga, you can still experience all of its amazing benefits! All of the yoga poses below will definitely help you get in shape and keep PCOS complications at a bay.
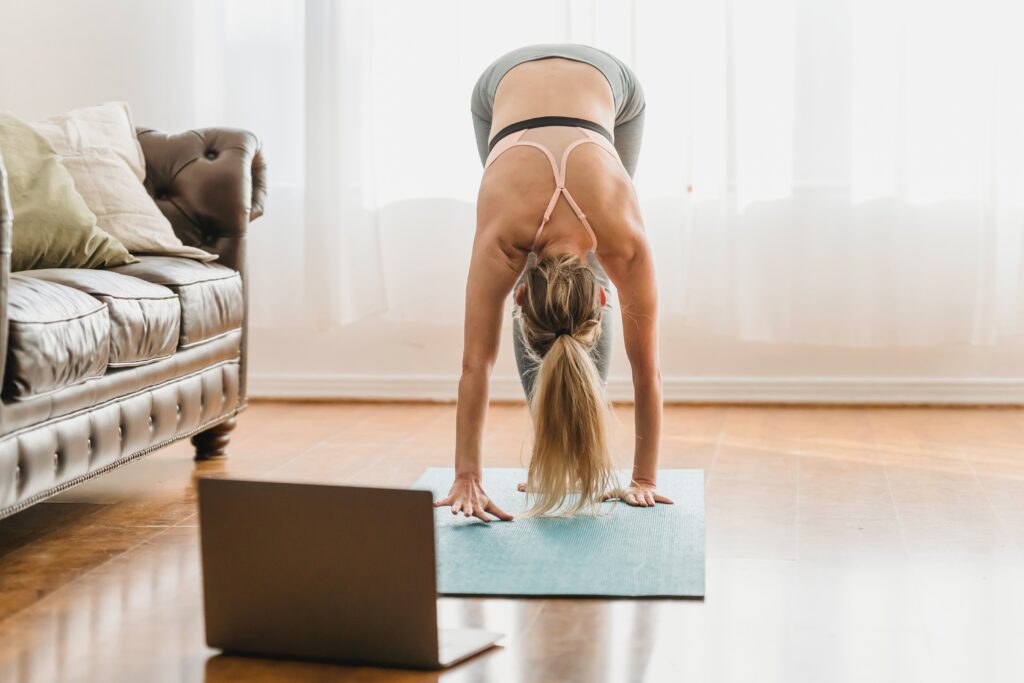
The Forward Fold
Steps
- Stand straight with your feet firmly on the ground, slightly apart for balance. Distributor your weight evenly on your feet and keep your back straight.
- Exhale and begin to bend your body forward at the hips.
Check: Do not bend your back, only bend from the hips joints.
- Keep your legs straight, the only bend should be at the hips.
(This step may require practice for days to attain this flexibility, you can start with these 5 simple yoga poses for weight loss, for the first week.)
- You should experience a stretch in your hamstrings, keep bending forward so that your forehead touches slightly below your knees.
- Let your head and neck hang freely.
- Breathe in and try to add more length to your torso, then breathe out to settle more deeply into the pose.
- Hold for 30 seconds to one minute.
- Gently come back to the starting position, relax and repeat 5 times.
Contraindications
- Back injuries
- Pregnancy
The Staff Pose

Steps
- Sit down on the ground with your legs joined together and stretched in front of you.
- Place your palms downwards next to your hips.
- The soles of your feet should be at a 90° angle with the ground. Exert pressure on the mat with your heels and palms as you tuck in your belly.
Check: Your collarbones should stretch and your back should be straight.
- Maintain this pose for 1 minute.
- Come back to a relaxed position and repeat this 4-5 times.
Contraindications
- Back surgery
- Lower back injury
- Wrist injury
The Chair Pose
Steps
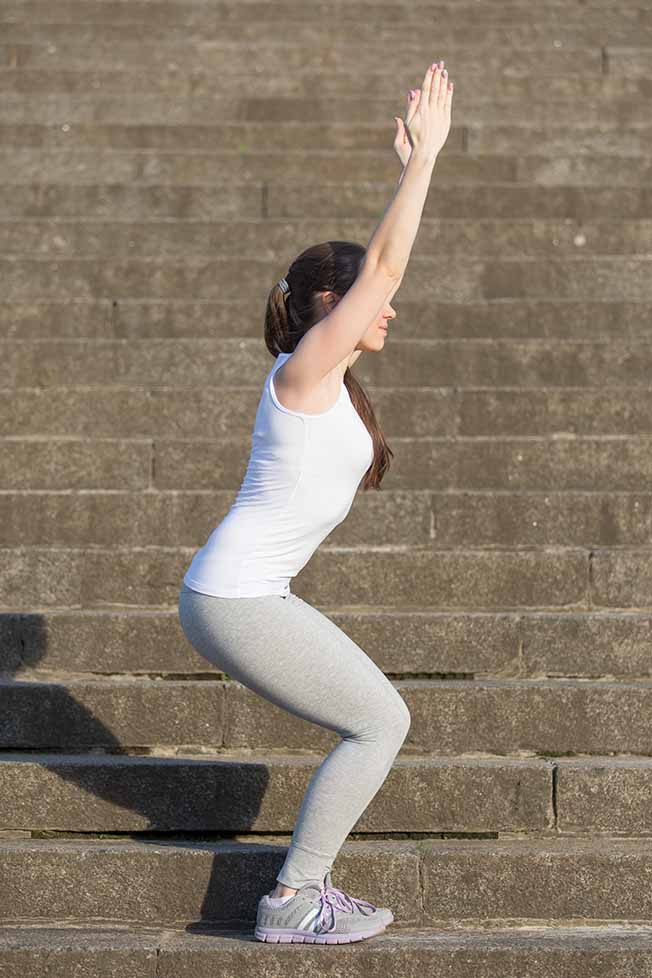
- Stand straight with a foot distance between your feet.
- Stretch your hands up as shown in the picture. Breathe in.
- Exhale as you bend your knee to bring your hips a little lower, in a chair-like position.
- Keep your things parallel to the ground.
- Hold this position for one minute and keep breathing normally.
- Gently stand up and lower your arms to come back to the starting position.
- Repeat it 3-4 times.
The Tree

Steps
- Stand up straight on the mat. Feel your feet firmly resting on it and keep your weight evenly distributed.
- Shift your weight on the right foot as you lift your left foot, bend your left knee and bring the sole of your left foot high onto your inner right thigh, so that your left heel is placed near your crotch.
- Press your left foot on the inside of your right thigh. Your right leg will be straight but slightly tilted to keep your body weight balanced. Keep your torso straight.
- Keep gazing in front of you. And join above your head as in the picture.
- Hold this pose for about 30 seconds to 1 minute and keep breathing normally and deeply.
- Breathe out as you come back to step1.
- Repeat 4-5 times.
Legs Up The Wall
Steps
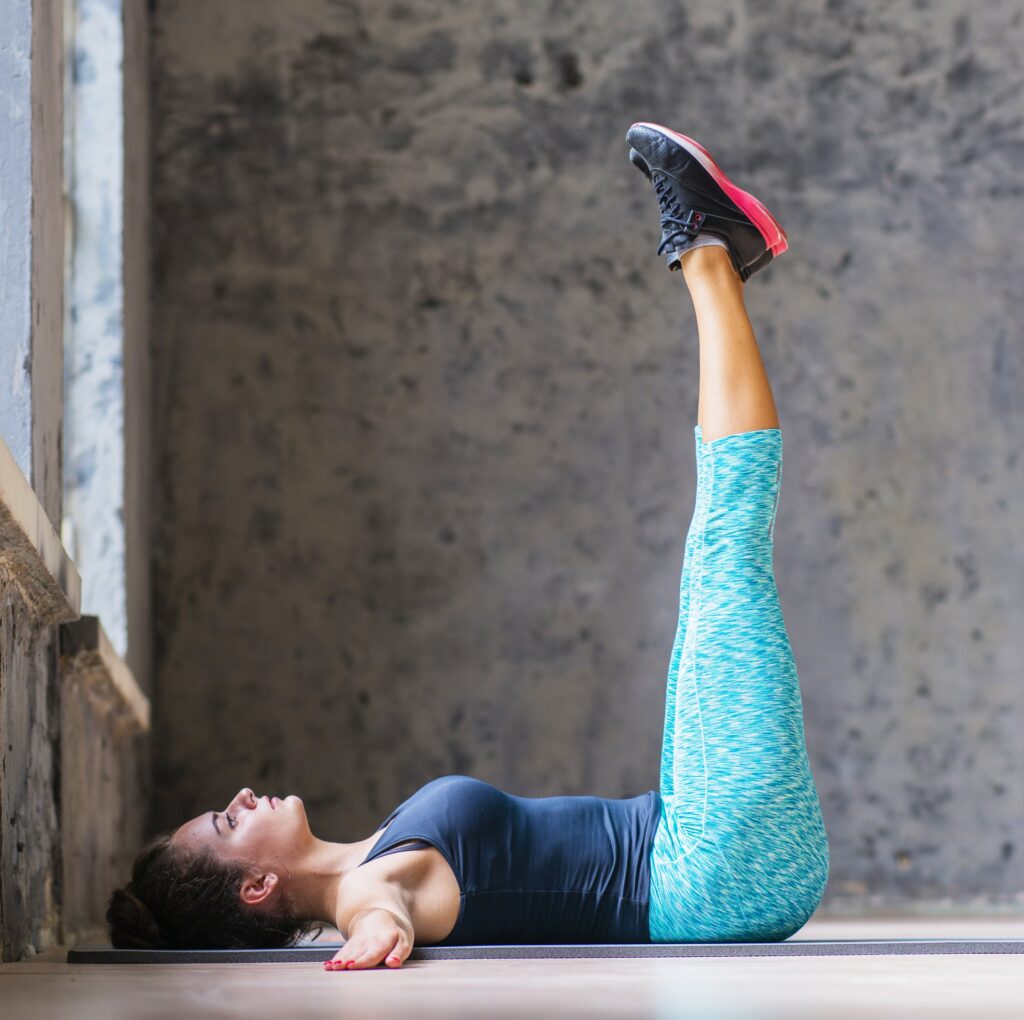
- Lie down on your back.
- Keep your arms stretched outwards on the mat, like the wings of a bird.
- Lift your legs and place them against a wall to keep them in position.
- Keep breathing regularly and hold the pose for 2-3 minutes.
- Repeat 2-3 times.
Contraindication
- Eye injury
- Back problems
- Neck problem
The Warrior Pose
Steps
- Stand up straight and relax.
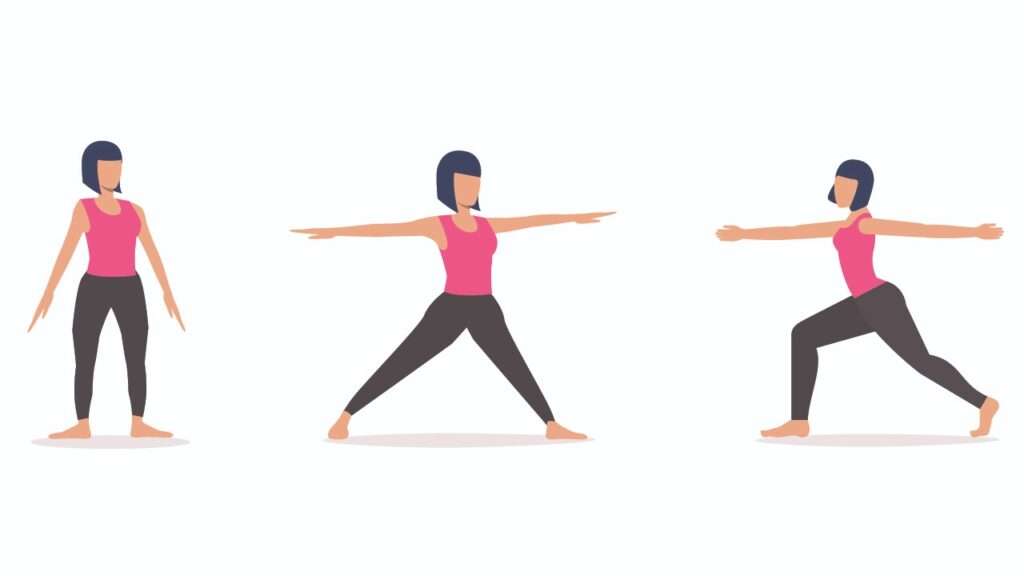
- Spread your legs, so that your feet are about 3-4 feet apart.
- Now turn your right foot 90° to the right and left foot about 15° to the right.
Check: look at the feet for reference in the picture.
- Lift your arms from the side until they reach the height of your shoulders, like in the picture. Keep your arms parallel to the ground and palms facing upwards.
- Exhale slowly and bend your right knee, so that the right knee and right foot’s heel are in a straight line i.e. 90° to the ground.
Check: your right thigh should be parallel to the ground.
- Now turn your head to the right so that your upper torso is slightly twisted.
Check: your right foot’s toes and your nose are facing the same direction.
- Along with step 6), also stretch your arms further like in the final picture.
- Gently push your pelvis downwards. Hold the posture for 5-10 seconds. Feel like a warrior and breathe gently.
- Breathe in and come up.
- Breathe out and bring it down.
- Gently come back to the initial pose.
- Repeat with your left leg this time.
Contraindications
- High blood pressure
- Heart problems
- Modifications for a shoulder injury
- Neck injury
The Bridge Pose

Steps
- Lie down on your back. Keep your legs straight and arms rested on both sides touching your legs.
- Bend your knees, bringing your feet close to your hips. Keep feet slightly apart, almost 1 foot. Place your palms facing downwards on the mat.
- Inhale and lift your torso with the support of your feet. Touch your chin to your body.
- Lift your torso as high as you can. Hold your ankles with your hands to gain more support and stability.
- Hold this pose for a few seconds.
- Breathe out as you bring your hands to your side and lower your torso and come back to the first position.
- Repeat this 4-5 times.
Contraindications
- Neck injury
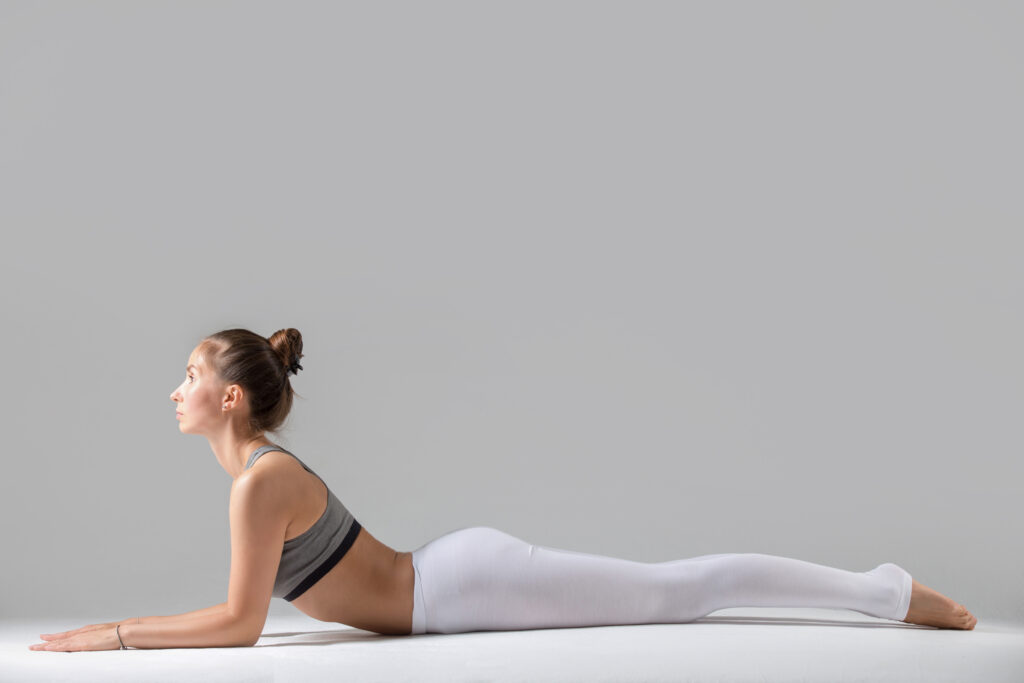
The Sphinx Pose
Steps
- Lie down on your stomach. Keep your legs stretched straight so that the soles of your feet are facing upwards. Join your legs firmly.
- Slowly up your head and torso and for support, place your elbows on the mat, right underneath your shoulders. Your forearms should be on the ground providing the support.
- Keep your belly touched on the ground and the rest of the upper body should be lifted.
- Keep your head straight like a sphinx, gazing comfortably in front of you.
- Take a few deep and slow breaths.
- Gently return to the lying down position, relax and repeat 3-5 times.
Contraindications
- Headache
- Back injury
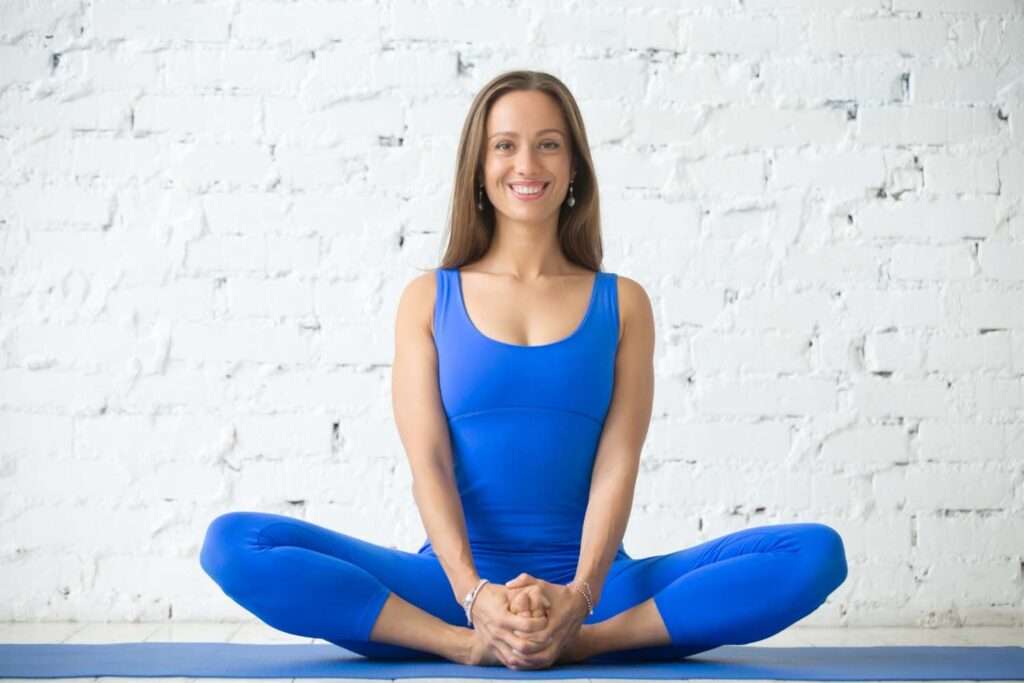
Butterfly pose
Steps
- Sit down on the mat so that the soles of your both feet are touching each other in front of you.
- Keep your spine and head straight. Clasp your palm around your toes. Keep your arms straight and stretched.
- Now move your knees up and down like the fluttering wings of a butterfly.
- Do this for 1-2 minutes at once.
- Repeat 5 times.
Contraindications
- Lower back injury
- Sciatica
- Pelvic or knee injury
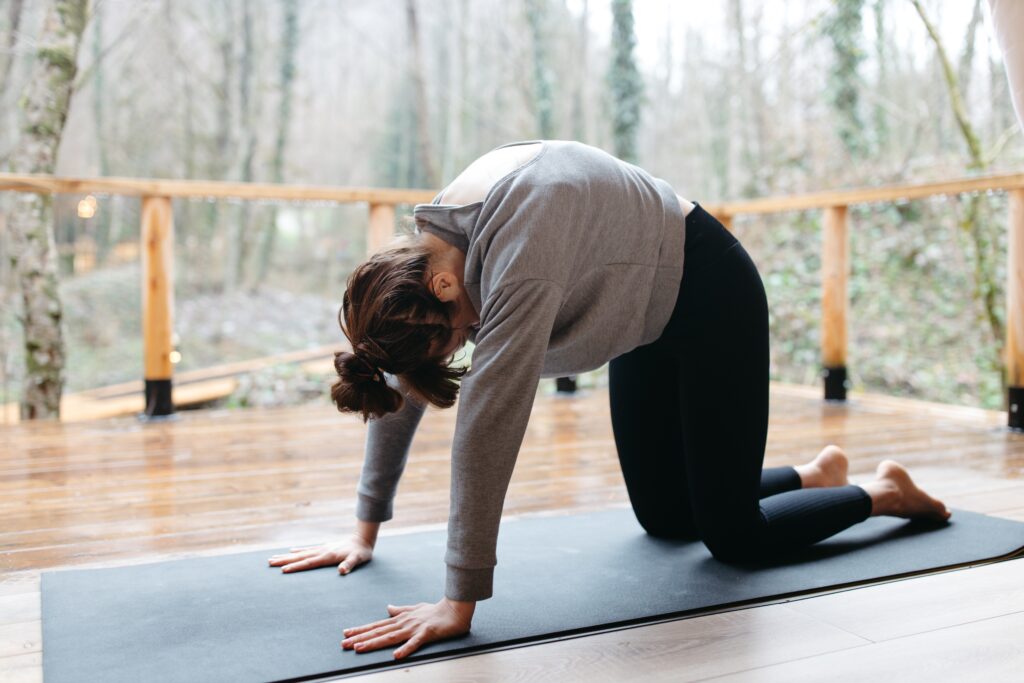
The Cat
Steps
- Kneel down on the yoga mat.
- Keep a slight gap between the knees and the feet.
- Now slowly bend forward and put your palms flat on the ground, like a four-legged animal.
Check: Your palms should be right below your shoulders. Your body should be parallel to the ground and thighs at a 90° angle with the ground.
- Breathe out, pull your back upwards making an arch and turn your head inwards to look at your things.
- Breathe in, lift your head up and now pull your back downwards making a reverse arch of step 4.
- This makes one cycle.
- Repeat this 4-5 times.
Contraindications
- Back injury
- Neck injury
Ayurvedic treatment for PCOS with yoga
Yoga exercises for PCOS belly are very important to help you get rid of PCOS and ensure regular periods, but that is not sufficient to cure PCOS. Polycystic ovarian syndrome is a complex endocrine disorder that can not be cured without proper diet and herbal medications.
Ayurvedic PCOS treatment when complemented by regular yoga sessions of 60 minutes, 3 times a week can lead to miraculous health benefits. This way yoga can help in improving insulin resistance and regulate metabolism which reduces weight and improves PCOS.
7 Important tips along with exercises for PCOS belly reduction:
- Proper PCOS diet that is low in carbs, healthy fats, and other nutrients.
- Follow ayurvedic tips to boost weight loss.
- The right amount of good carbs to balance the glycemic load for insulin resistance.
- Adequate sleep is important to allow your body to heal itself.
- Dosha specific diet to improve hormonal balance.
- Combat stress to lower cortisol levels.
- Do not stay hungry for a very long time. Eat protein-rich snacks to feel full for hours and to avoid overeating.
All of these points are taken care of during the Ayurvedic natural treatment. The treatment becomes a powerful way to get the best of the exercises for PCOS belly.
Key Takeaways
Belly fat is very common in PCOS disorder. The majority of yoga positions stimulate hormonal glads and encourage your internal organs to function efficiently.
All these exercises for PCOS belly also promote deep and controlled breathing which helps you achieve a better mind-body relationship. They are good for your overall physical and mental fitness as an added bonus to your flat tummy.
All these poses are safe if you keep the stated contraindication in mind, however, it is advised to seek an expert’s help to guide you about the personal modifications and to avoid minor injuries.
FAQs
- Eat more healthy carbs and avoid unhealthy carbs (or at least limit them)
- Drink warm water
- Chew food properly, the more you chew there faster you’ll feel full
- Do exercises that target belly fat
- take adequate rest
- Walk after meals
Yes. It is tough to lose weight and get a flat stomach with PCOS but it is not impossible. With the right combination of diet and exercise plan (yoga) you can visibly reduce weight and even lower your testosterone levels, which help in curing PCOS.
Weight loss aids PCOS cure in multiple ways.
- improves insulin resistance
- lowers androgen levels
- reduces stress-causing cortisol levels
- stimulates healthy hormone secretion
- regulates natural periods
So, weight loss plays a pivotal role in curing POCS in all-natural ways.
When left untreated it may lead to-
- Impaired glucose tolerance and diabetes
- Cardiovascular disease and hypertension
- Endometrial cancer
- Ovarian cancer
- Fertility/Pregnancy complications
- Psychiatric complications
PCOS should be cured as soon as it is diagnosed. Ayurvedic treatment for PCOS is the best available option for ladies that do want to prevent allopathy medicine side effects.

